初めに
こんにちは、決済認証システム開発事業部の陳です。 会社では、iOS、Androidなどネイティブアプリ開発に携わっております。
巷ではChatGPT、Diffusion AIなどAIの活用について話題に上がっており、 様々なデバイス、サービスへ導入するなど試行錯誤が行われております。
流行りに乗る感じで、ネイティブアプリにPythonを導入する方法を解説したいと思います。 OpenAIを利用したサンプルアプリまで数回に分けて記事を投稿する予定です。 今回は第一弾になります。
BriefcaseよりiOS用のライブラリを生成
Briefcase - togaで、Pythonを導入した状態のiOSプロジェクトを作成できるので、必要なライブラリを取り出し既存のプロジェクトに導入するという流れになります。 docs.beeware.org
仮想環境を構築してBriefcaseのライブラリをインストールしてプロジェクトを作成します。 プロジェクト名はHellowWorldで大丈夫です。
python3 -m venv venv
source venv/bin/activate
briefcase new
プロジェクトのフォルダに移動し、iOS向けにプロジェクトを出力します。
cd helloworld
briefcase create iOS
XcodeにPythonライブラリを導入
生成したプロジェクトのSupportフォルダをそのまま、導入先のプロジェクトに コピペします。
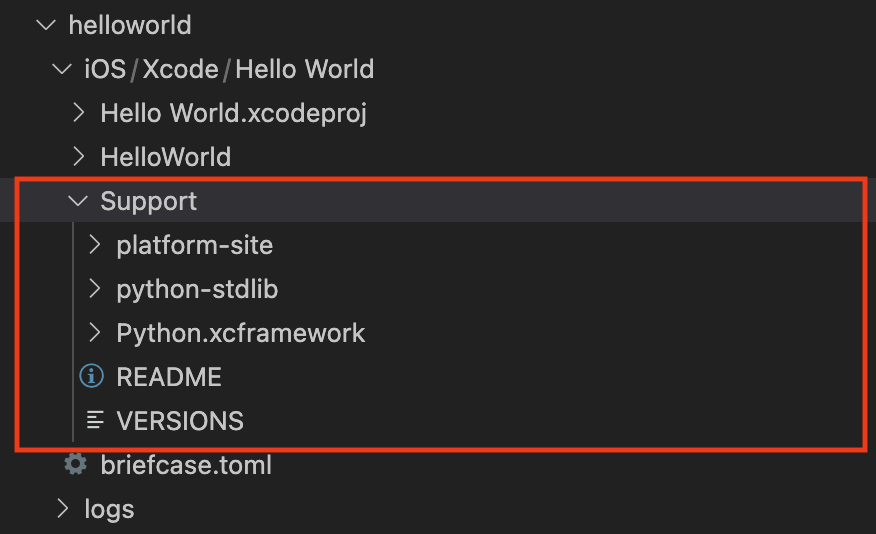
Briefcaseに関する作業はこれで終わりです。 次にXcodeに下記の設定でSupportのフォルダを追加します。
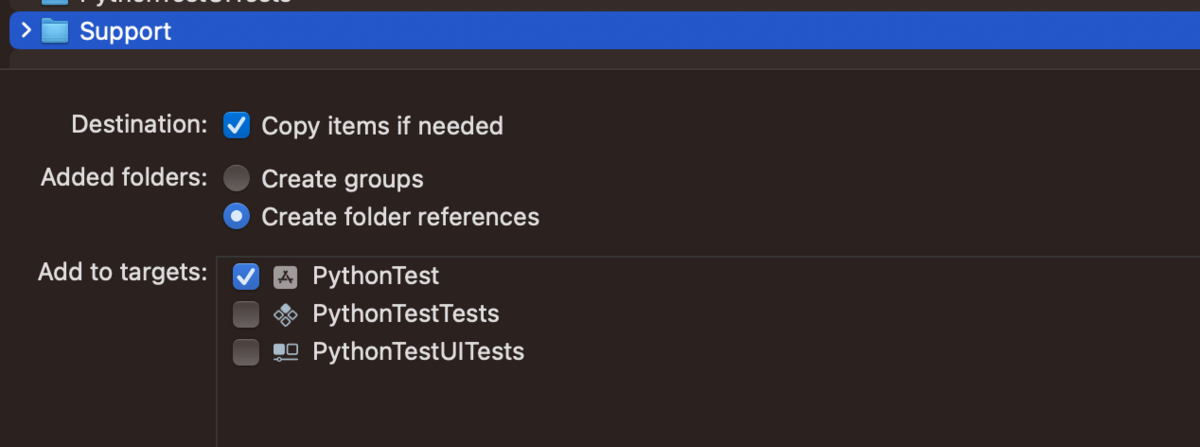
Python.xcframeworkも忘れずにLinkしてください

Python用ブリッジファイルの追加
Python.h (C言語)を利用するため、Objective-C File、Header Fileを追加します。
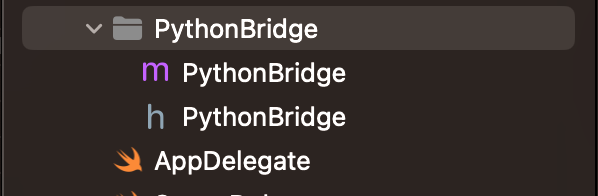
Build SettingにPythonBridge.hを登録します

テストコードを実装し、正常に動作するのか確認します。
// PythonBridge.h

void bridgeTest(void);

// PythonBridge.m

void bridgeTest() {
    NSString * resourcePath = [[NSBundle mainBundle] resourcePath];
    NSLog(@"resourcePath: %@", resourcePath);
}
NSLogよりアプリのインストール先が出力されるので、Supportの一式がコピーされているのか確認します。

PythonのライブラリまでPathを通す
Pythonを動かすためには、PYTHONHOMEを設定する必要があり、先ほどNSLogで出力した先までPathを通す必要があります。 BriefcaseのiOSプロジェクトより Supporting Files -> main.m を参考にPythonの環境を設定します。
// PythonBridge.h

void initilaizePython(void);
void testModuleFunction(void);


// PythonBridge.m

void initilaizePython() {

    PyPreConfig preconfig;
    PyConfig config;
    wchar_t *wtmp_str;
    NSString *resourcePath = [[NSBundle mainBundle] resourcePath];
    NSString *path;
    NSLog(@"resourcePath: %@", resourcePath);

    PyPreConfig_InitIsolatedConfig(&preconfig);
    PyConfig_InitIsolatedConfig(&config);

    preconfig.utf8_mode = 1;
    config.buffered_stdio = 0;
    config.write_bytecode = 0;
    config.module_search_paths_set = 1;

    // Python 初期化開始
    Py_PreInitialize(&preconfig);

    // Python Home Path
    NSString* python_home = [NSString stringWithFormat:@"%@/Support/python-stdlib", resourcePath, nil];
    wtmp_str = Py_DecodeLocale([python_home UTF8String], NULL);
    PyConfig_SetString(&config, &config.home, wtmp_str);
    PyMem_RawFree(wtmp_str);
    PyConfig_Read(&config);


    // Module Path
    path = [NSString stringWithFormat:@"%@/Support/python-stdlib", resourcePath, nil];
    wtmp_str = Py_DecodeLocale([path UTF8String], NULL);
    PyWideStringList_Append(&config.module_search_paths, wtmp_str);
    PyMem_RawFree(wtmp_str);

    // Python 初期化完了
    Py_InitializeFromConfig(&config);
}

void finalizePython() {
    Py_Finalize();
}
ViewController -> viewDidLoad で上記処理をテストし、正常に動作することを確認します
 initilaizePython()
 finalizePython()
Pythonを実際に動かす。
Supportフォルダと同じ要領で、PySourceを追加します。
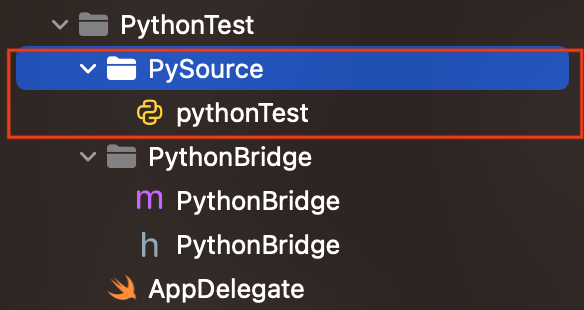
// pythonTest.py

def printTest():
    print("Load Python Success")
PySourceにPathを通します
// PythonBridge.h

void testModuleFunction(void);

// PythonBridge.m

void initilaizePython() {
 ~~~
    path = [NSString stringWithFormat:@"%@/Support/python-stdlib", resourcePath, nil];
    wtmp_str = Py_DecodeLocale([path UTF8String], NULL);
    PyWideStringList_Append(&config.module_search_paths, wtmp_str);
    PyMem_RawFree(wtmp_str);

    // PySource
    path = [NSString stringWithFormat:@"%@/PySource", resourcePath, nil];
    wtmp_str = Py_DecodeLocale([path UTF8String], NULL);
    PyWideStringList_Append(&config.module_search_paths, wtmp_str);
    PyMem_RawFree(wtmp_str);
 ~~~
}

void testModuleFunction() {
    PyObject *module = PyImport_ImportModule("pythonTest");
    PyObject *function =  PyObject_GetAttrString(module, "printTest");
    PyObject_CallNoArgs(function);
}
ViewController -> viewDidLoad で上記処理をテストします
initilaizePython()
testModuleFunction()
finalizePython()
consoleにprintされているはずです。 結果は自身で試してみてください。
まとめ
簡単なPythonのスクリプトを実行できるまでの流れは以上になります。実用には、様々なライブラリをimport必要があり、次回の記事で特集する予定です。
採用リンク tecotec.co.jp